IR training, Weather and Schedules

So I have only had one lesson in the last 3 weeks due to my work schedule as well as weather.  (I really don’t want to see what’s it like landing with the winds are 20G35 in my Cessna 172!)

That one lesson I did have however made it clear just how quickly you can take a step backwards in your training.  First half of the lesson I was having difficulty keeping altitude and heading, but slowly got back to where I needed to be.  Got to try a VOR approach as well as some hold entries.  Overall not my finest hour, but at least I did it.

Question becomes do I try to get in a handful of lessons knowing that I’m going to have a few weeks between now and the middle of April where I can’t fly, or do I just go up on my own and do some pattern work / VFR flights.

Practice Project #1

As I was reviewing the plans the other day, I realized that I had skipped the first practice project completely.  Oops!  So decided I would complete that before I went back to the control surface project.

First step, was to mark up one of the sheets and measure where to center punch for each of the rivet holes.

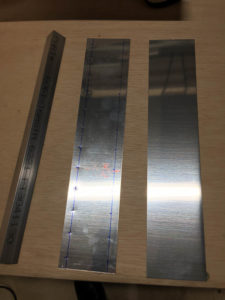
Using the cleco clamps, make the first hole, install a cleco and continue down the line.  Deburr all the holes, then figure out how to install (dimple / countersink) for the AN426AD (flushmount) rivets.  The sheet is too thin to countersink, and the metal bracket below is too thick to dimple.  I’m totally guessing at this point, but I decided to dimple the skin and countersink the “L” bracket to allow the sheet to sit flush.  (did a few tests on some scrap pieces, and thought this was the best choice!).

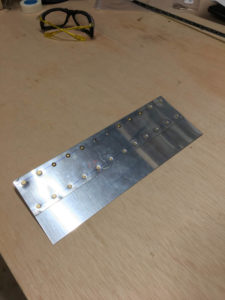
Once everything was appropriately dimpled and countersunk, I started to rivet.  Two center rivets were Blind (or POP) rivets.  Fairly easy.

Next, 3 of the AN470 on either side of the pop rivets.  This is where I really enjoy having the squeezer.  A little minor tweaking of air pressure and squeeze distance and my AN470AN4-r rivets were set.

Lastly I set the AN426AD4-4 rivets in the dimpled / countersunk holes.  Honestly I think my dimple or countersink on one of the holes may have been slightly off (or not deep enough).  Looks like the final sheets didn’t sit completely flat.

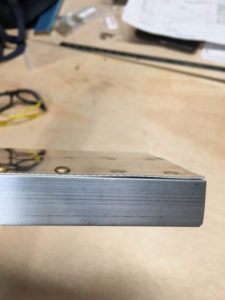
Sheet to sheet with the AN3 rivets was quick and easy.  If I had additional blind rivets, I might try to drill the first row out and adjust the countersink.  I’ll have to think about it.

Structural Dimple Dies and Back Riveting

Decided to purchase a set of Cleveland Tool Structural Dimple Dies to see how they work since the Practice kit is a great place to try some new things!

Got the Ribs deburred and match drilled.  Used my standard dimple set to dimple the skins, then switched to the new structural dimples to dimple the ribs.  Wouldn’t you know the structural dimples worked as advertised.  (Sorry, in my excitement I didn’t take pictures!)


On to back-riveting, went ahead and put the rivets in the skins and taped them down.  Flipped the piece over and added the ribs.  Back-riveted 2-3 rivets before I had to call it a night as I was making a bit too much noise at 9pm.  Oh well, I’m all set up and ready to start again on Friday afternoon.  I have a feeling I’ll have the control surface completed by the end of the weekend.


Control Surface Practice Kit – Getting started

Since I can’t make any further progress on my toolbox, I decided to go ahead and open up the other Practice Kit.  This is more like what I was expecting!

First instructions at to fabricate a stiffener using some longer pieces of stock.  EXCELLENT!  Had to sit and stare at the diagram for a bit to understand exactly what was being asked, but think I figured it out.  Some quick work on the band-saw as well as the Scotch Bright wheel and we are all set.  Only issue is that I think Vans has a small error in the diagram.  They put the wrong label on the “R” and “L” pieces showing how to fabricate.  If you label the parts that way, they don’t match the exploded part diagram and layout image.  Easy enough to fix as I don’t see how putting them in “backwards” would cause any issues.  I just relabeled my parts.

I’m ready to do some match drilling but going to hold off for a bit.  Already had lots of fun, and don’t want to finish my new project in one day!

Also, I want to wait for my sub-structure dimple die from Cleveland-Tool to arrive to see how well they work.

All for now.

Mistakes have already been made!

Just when you think you totally understand what needs to be done, take a second look.

The directions for how to attach the hinge to the toolbox didn’t fully make sense to me, but I “thought” I understand what was being asked.  OOPS!, I was mistaken, and the holes I drilled were far too close to the edge of the hinge material.  (The hinge attaches to the OUTSIDE of the toolbox!).  Also when they say that the eyelets should be flush with the top of the box, they mean that the top of the eyelets should be flush, not the bottom.  Oh well.

So this means that I will be putting the build of my tool-box on hold until I can order a new hinge.  Not the worst thing in the world, but slightly annoying.  The debate is, order the part now, or wait until I order the Empennage just in case my next practice kit also needs some replacement parts!

I’ll see if I can do any additional steps, or if I just need to wait until the new hinge arrives.  Bummer.  I was just starting to have fun putting this together!